The following are general instructions for adding and editing content within content prototypes or websites provided by the College of the Environment Marketing and Communications team. More detailed support documentation for WordPress is available on the WordPress website.
Logging in
Visit your content prototype or website using the url provided by the Marketing and Communications team. Click on the staff login link at the bottom of the page.
![]()
Adding and editing news
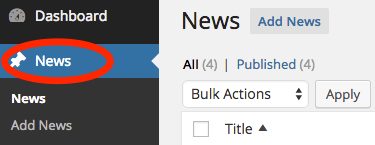
At the Dashboard, click on the “News” tab on the left side of the page. This will take you to the full list of news posts on your website.
- To edit an existing news post, click on its title.
- To add a new news post, click “Add News”.
- The news page always displays posts in reverse chronological order, with the most recent news post shown first.
Each news post should contain the following content:
- Title: The first field shown when editing or adding a news item. (required)
- Content: The large white box, topped with editing options (e.g. bold, italic, lists, etc.) (required)
- Story source: Adds a link to an external website. Enter the full url of the source page you want to link to in the “Story Link URL” field (e.g., https://environment.uw.edu/news/a-story-title) and the text for the link in the “Story Link Text” field (e.g., Read more at the College of the Environment.) WordPress will add a link to the bottom of the news story.
News categories
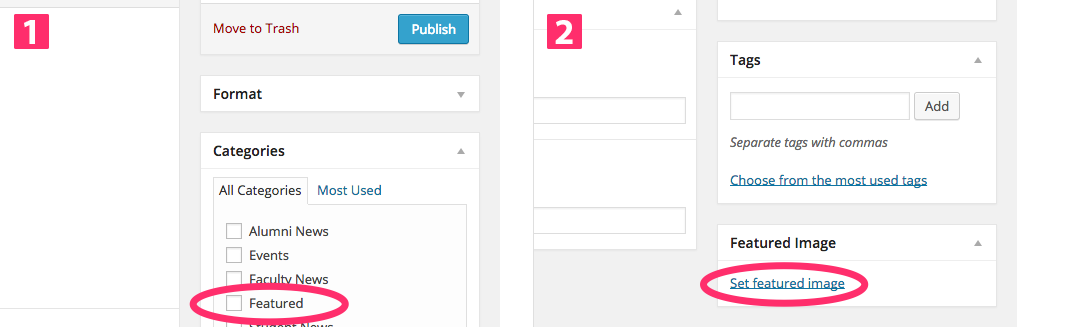
On the right side of the editing page, you’ll see a box with “Categories” (or topics, locations, etc.) that relate to your news posts. Check the appropriate category to assign it to the news item. Be careful while using the “+ Add New Category” to add new categories – categories should be permanent and used on many posts.
Featured image
This image is the primary image related to your news post. If the post is featured on the homepage, this is the picture that will be displayed. Clicking “Set Featured Image” will open the WordPress media panel, where you can select or upload images. More about the media panel below.
Featured news
You can set aside a single news post as the “featured story”. Featured stories are highlighted on the homepage, must include an image, and don’t fall off of the homepage when more recent news is published. To mark a news post as featured, do the following:
- On the news add/edit page, add the “Featured” category to the news post by checking the appropriate box in the right column under “Categories.”
- Add a “Featured image” to the news post by clicking “Select Featured Image” in the right column under “Featured Image.”
Please note that only the most recent featured story will display on the home page. If you want to feature an older story, please remove the “Featured” category from all news posts published after the story you want displayed.
Adding and editing pages
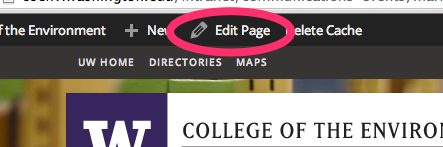
Click on the Pages tab on the left, and either “Add Page” or choose a page in the list and click “edit”. When logged in to WordPress, you can also browse the site and edit any page by clicking “Edit Page” in the top navigation bar.
Adding pages
When logged in and viewing the admin “dashboard” side of the site, click on “Pages” and then click “Add page,” or hover on the “New +” link on the WordPress header and click “Page.” Enter your content in the content area, but do make sure you set a parent. Page parents are in the page attributes widget on the right side of the desktop view. Click “Save” to save as a draft or “Publish” to add the new page.
Important: When adding or reordering pages, please note that any page marked “show this page in main menu” that does not have a parent will display in your main navigation bar.
Editing pages
Editing pages can be done by clicking on the “Edit page” link on the top of any public page on the site. Alternatively, if viewing the Dashboard click on the “Pages” link on the left side, and edit the page you wish there. Click “Update” to update the page.
Page order and hierarchy
Pages are displayed in the dashboard in a specific order and hierarchy and can be reordered by clicking and dragging. Changing the order will also change the order in site navigation.
Pages are also nested in a specific hierarchy, with sub-pages and sections nested inside their parents. Page hierarchy is displayed using hyphens before the page title, with one hyphen used for each level. For example, “- My Page” is one level down, while “– My Page” is two. You can also set page hierarchy while editing a page by selecting a “Parent” under Page Attributes in the right column of the editing view.
Adding and editing faculty
Faculty profiles are in another content type called “Faculty”. Faculty content has its own set of special fields that cover publications, CV’s, and contact information.
Notes on faculty content:
- Faculty images will default to a placeholder if none is selected.
- Faculty are always sorted alphabetically by last name.
Formatting text
Although the text editor in WordPress looks a lot like a word processing program, there are differences between formatting for print and formatting for the web. Instead of specifying text sizes, boldness and fonts individually, sets of formatting attributes are contained in “styles.” The styles you’ll use are heading styles, which are useful for people scanning text. To apply styles to your text follow these instructions:
- If this is your first time editing, or the style selection box isn’t showing, click on the button “Show/Hide Kitchen Sink” for a fuller set of formatting tools.“Show/Hide Kitchen Sink” is the last button of the first row of buttons on the screenshot to the right.
- Highlight the text you would like to make into a header.
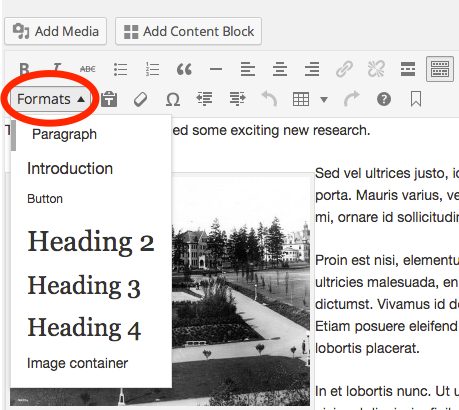
- When in the “Edit News” view, you will see a dropdown menu that usually says “Paragraph,” the default type of text (this text is styled as a paragraph) click on it to view different styles.
- The styles are:
Heading 2
Heading 3
Heading 4
- Select a style: Heading 1 is used on page titles, so no need to use it (ever!). Heading 2 is most commonly used for sub-titles, and heading 3 works for sub-sub titles. The page you are reading now uses Heading 2 for sub-headings. The introduction style is for introduction text at the top of the page, and the button style can be used to make text into a clickable button (just remember to add a link to that text as well).
- Hyperlinks are added by clicking on the hyperlink button. When adding links, please add a short, descriptive title in the field provided. Link titles are an important accessibility consideration for screenreaders. When in doubt, use the link text as the title. Please select “Opens in New Window” when linking to a page outside of your website.
Adding and editing hyperlinks
Adding a hyperlink
- Highlight the text, image, or button you would like to link.
- Click on the link chain ⛓️ button on the toolbar.
- A box will appear, you can insert a URL directly or use the box to search for the title of a page, post or profile on your website.
- Push the blue enter button to add the link.
Editing a hyperlink
- Click on an existing link, and the link editing box will appear.
- Use the broken link to remove the link, or the pencil to edit the link.
Force a hyperlink to open in a new tab
- When adding or editing a link, find the gear icon to change the link settings.
- When the link settings modal pops up, select “open link in new tab”
- This will force the behavior of this link to always open this way, this is recommended for pages that are external or supplementary to content.
Adding Anchor Tags
Anchor tags can allow you to link to a specific part of a page. This can be helpful for long pages with many sections.
To create an anchor:
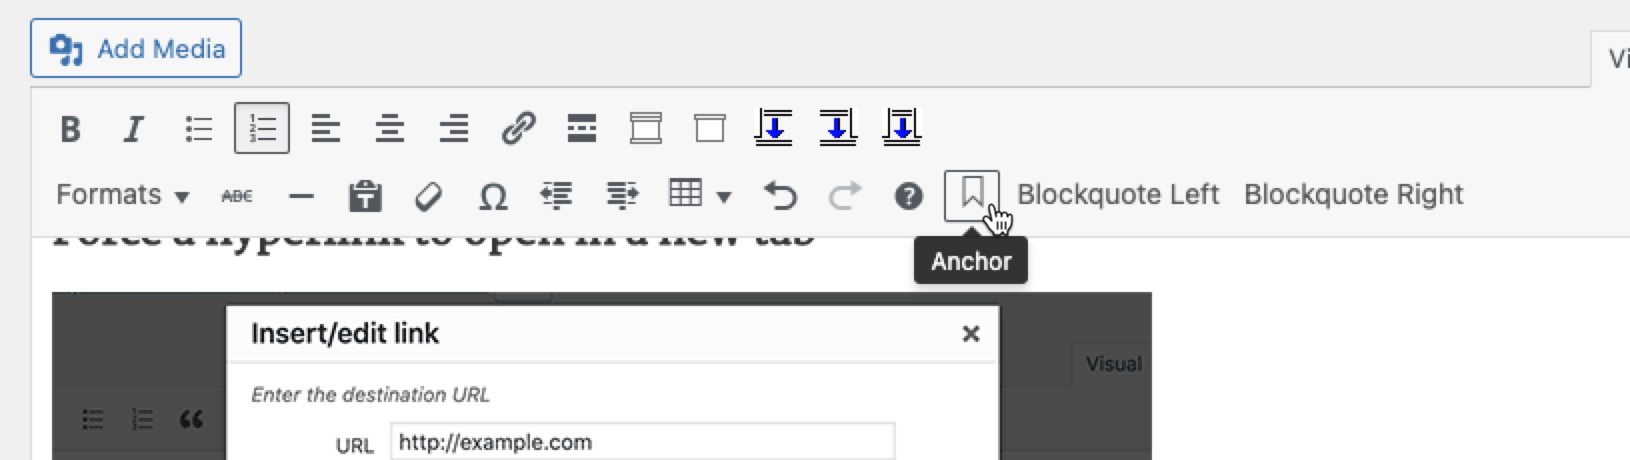 Move your cursor to the beginning of the line of text you’d like to anchor to. Click here so the ‘caret’ (flashing text editing line) is at the start of the line of text or heading.
- Click on the anchor button, it is at the end of the second toolbar and looks like a bookmark.
- Then a modal prompt will appear asking for a name for the anchor. Choose something simple, without capitalization or spaces, and one or a few words. This word will appear in the URL. (examples of anchor tags: diversity-scholarship, travel-fund, contact)
- When you have clicked “OK” there will be a tiny ship anchor icon that will appear to the left of the text. Don’t worry, this is only visible to you on the editing screen, website users will not be able to see it.
- Add a link, just like above on the text you want to link to the anchor, but instead of a url, type in your anchor with a # symbol in front. (examples: #diversity-scholarship, #travel-fund, #contact). There’s no URL, that’s it.
- Hit preview and try your new anchor link, it should scroll the page down to the anchor tag. You can also share URLs with the anchor tag by writing the url, and including the anchor at the end, like this: https://environment.uw.edu/intranet/marketing-communications/editing-unit-content/#anchor-tags
Uploading and Placing a Picture or File
- While editing a page, click on the spot you want your picture or file link to go, then click on the “Add Media” button.
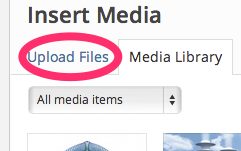
- If uploading a new file click “Upload Files,” otherwise, select your image/file here in the Media Library and skip to step 4.
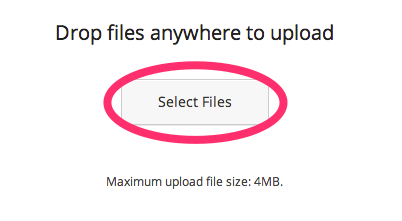
- Click “Select Files” and choose the file(s) you want to upload.
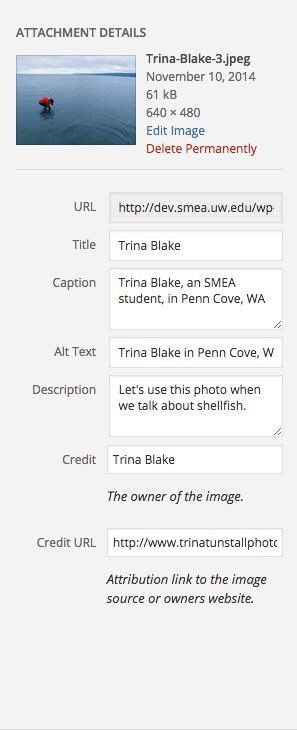
- Please complete as many of the “Attachment Details” fields as possible. The fields are:
- Title: The name of the image, or what you want the file’s text to say on the website (e.g. “November 4, 2013 Meeting Minutes” or if described elsewhere, “Minutes”). (required)
- Caption: For images only – a caption that goes under the image.
- Alt Text: For images only – this text is for visually impaired users who use screen readers, or for people with very low bandwidth connections. Please fill it in with a short description of the image, it makes our site more accessible. Note that this text will be used in lightboxes instead of the caption text. (required)
- Description: Optional text that describes the image internally.
- Credit: Text that appears below the image showing its’ source. Image credits are required when using an image where someone outside your organization owns the copyright, unless the image is licensed for distribution without attribution.
- Credit URL: The link that the credit text will go to.
Attachment display settings are different for pictures and files.
- Pictures: Choose Alignment: Right, Link to: Media File. These are our default settings, and if you want to change them, do so carefully.
- Files: Use default settings. Link to: Media File.
- Click Insert into page/post.
- If you want to edit a picture further, click on the picture and click the edit/pencil button. To delete, click “delete”.
Accordions
The accordion buttons in the editor toolbar add shortcodes to your content which enables a spot to have an expandable hidden content box. It is always recommended to check the “click to close accordion” option. Accordion codes need to be paragraph text, not a heading.
When you click the “Add an Accordion Group” and the “Add an Accordion Item” button, the two shortcodes that are added respectively are:
[accordion clicktoclose=true]…[/accordion]
and
[accordion-item title=""]…[/accordion-item]
When formatted correctly this is what you’ll see, even in the visual editor:
[accordion clicktoclose=true]
[accordion-item title="Title of accordion item"]Drop-down content goes here.[/accordion-item]
[accordion-item title="Second accordion item"]Drop-down content goes here.[/accordion-item]
[/accordion]
And this will output the following:
Title of accordion item
Second accordion item
Adding and editing content blocks
Content blocks are short pieces of content that can appear on different parts of your website than the main content area. Content blocks can be placed in sidebars, sections on the homepage, and as calls to action at the end of pages. Content blocks are placed in these sections using the WordPress widget system.
Creating content blocks
To create or edit a content block, click on the “Content Blocks” tab on the left side of the Dashboard. Here you will see a list of content blocks. Click on any of their titles to edit them, or click “Add New” at the top of the page to create a new content block.
- Title: This title will appear above your content block, but it can also be disabled.
- Block Text: This is the main content area for the content block. This field should only contain text – Content block images should be added using the featured image field for the content block (see above).
- Links: Up to two links, added as buttons at the bottom of the content block.
Positioning content blocks
Content blocks are not displayed by default and must be paired with pages using the WordPress widget system. To position content blocks, click on Appearance, then Widgets.
The sections on the right side are the different widget areas on the site. There are widget areas per each top level section, and before and after all body content. Drag the “Content Block” rectangle under the “Available Widgets” heading over to the right side section that you want the content block to appear on. Once the box is placed, you’ll see options to select which content block you want to use. Click save when you have finished configuring options – this will make the content block live on your site.
Next to the save/update button is a visibility button that determines, with greater granularity, which pages your content block will show up on. Use this to have content blocks that only show up on specific pages or news items. You can also exclude content blocks from pages using this same tool.
Site settings
Site administrators can see additional settings that content editors cannot – these are found in the “Appearance” and “Settings” tabs on the left side of the WordPress administration interface. When misconfigured, some site settings can break your layout and alter site features. Please tread carefully within this section and only make changes if you’re sure you know what you’re doing. Contact our team if you have any questions.
Under Appearance you’ll find:
- Widgets – this menu will help you add content blocks to the homepage and sidebar. Please contact us for more details.
Under Settings you’ll find:
- General – this section has settings for social media, your site description, name of your unit, and address.
- Writing – this part can set the default category for new posts. A default category must be selected.
- Reading – here you can change how many posts appear on the news page.
Other resources and tips
Embeds and iFrames
Embeds are all managed by the College Web Team. Unfortunately, it is a security risk to allow units to insert their own embeds or iframes from unvetted sources. If a page has an embed on it, it will require the College Web Team to update the embed. Sometimes when unit editors change these pages, the embeds will break, contact us if that happens.
WordPress has built-in functionality for a wide variety of embeds, including YouTube links, Tweets, and Spotify. Try pasting in a link and watch it magically appear.
Some college sites have special “shortcodes” for embedding limited 3rd party tools like Tableau. Please contact us for support with these or to request the tools be added to your site.
Marketo
To create a link to your Marketo emails:
- Send a sample to your email.
- Click on “view the web version of this message”
- Copy the url that begins with http://discover.w.edu” — if the url begins with “explore.uw.edu.” you’ve copied the wrong link
Trumba
The calendar system Trumba is managed through UW-IT. You can find documentation on how to use Trumba on their website, and can contact help@uw.edu for Trumba support. Our team will embed Trumba Calendars on a page on your website once you set up the calendar with UW-IT.
WordPress.com and WordPress.org
When looking for the solution to a problem on Google, you might find that our websites don’t have all the features that the tutorial is mentioning. There’s a confusing split between WordPress.org, which makes the free software we run on the UW server, and WordPress.com which offers a customized version of the WordPress software on their servers for a fee. You’re looking for generic WordPress support, not articles from WordPress.com.
Gutenberg or the block editor vs. the classic editor
WordPress has updated their editor in recent years to a new system called the “Block Editor” or “Gutenberg”. Currently, all College websites are on the classic editor, NOT Gutenberg. We may change that in the future.
Helpful Links
Contact College Support
If you need help with any edits or a bug on a website in the College of the Environment framework, contact envhelp@uw.edu. One of our team members will get back to you shortly with assistance.
For best results, have 1 issue per support email thread, with a description and a link or screenshot showing where the problem is happening.
Dean's Office Contact: